
Tags can be used to divide contacts into different categories. Here you'll learn how to capture tags and assign them to contacts.
Note: Manage tags belongs to the paid extension, Contacts.
Table of contents
Tags are freely selectable terms with which you can use to help identify and mark your contacts. This allows you to group or categorize selected contacts. This simplifies the management of contacts.
Example
You want to distinguish the employees of your company from all other contacts. This is possible by giving them the tag "employee".
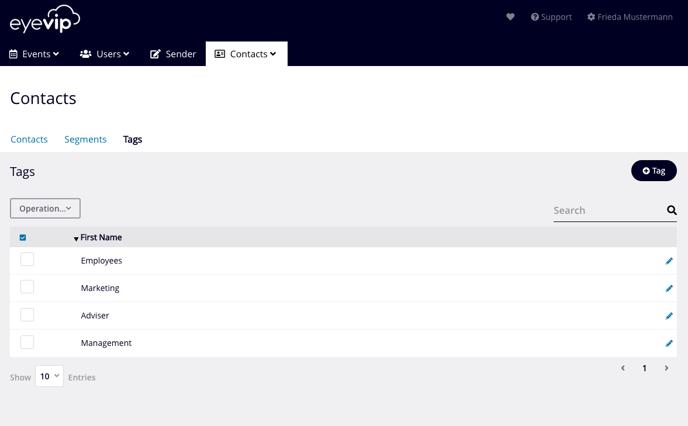
Create tags
This is how you create a new tag:
- Choose Contacts > Tags from the main menu.
- Click the + tag button.
- Enter a name for the tag and click Save.
Assign tags to contacts
Manually assign tags to a contact
- To edit the contact click on the blue pencil icon on the right-hand side of the row of the desired contact
- On the right click on the blue label in the Tags field. You'll see the list of all the tags you have already entered.
- Select the desired tag.
- Repeat the process if you want to assign multiple tags to a contact.
The tags that have already been assigned are listed below the Tags field. They can be removed from the contact again using the X symbol the right of the respective tag.

Import tags via the contact list template
Tags can be entered in the contact list template and can thus be imported with the rest of the data. The Tags column is used specifically for this purpose.
If you want to import multiple tags per contact, use a comma to separate them.
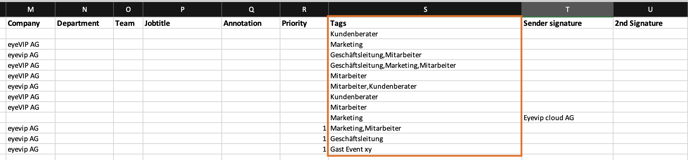
Good to know: The tags must already be saved in eyevip and the notation in the Excel template must match the tags in eyevip.
Assign tags via bulk edit
If you want to assign one or more tags to existing contacts, you can do this via bulk edit. You can find more information about this in Manage contacts.